
The Ultimate Guide to Stacking & Layering Jewelry
Layering jewelry without tangling or looking cluttered comes down to three basic elements: varying your lengths, keeping a clean focal point, and mixing textures. Whether you are building an ear stack or layering necklaces, a structured approach keeps your collection looking intentional instead of overwhelming.
How to Layer Necklaces Without Tangling
The biggest frustration with necklace layering is twisting chains. You can prevent this by focusing on spacing, chain weight, and contrasting weaves.
The 2-Inch Rule
Always leave at least 2 inches (5 cm) between chain lengths. This gives each pendant room to rest without colliding with the chain below it.
| Style | Standard Length | Best Layering Position |
| Choker | 14 inches (35 cm) | Base layer (sits right at the collarbone) |
| Princess | 16–18 inches (40–45 cm) | Main accent layer or small pendant |
| Matinee | 20–22 inches (50–55 cm) | Heavy pendant or statement charm |
| Opera | 24+ inches (60+ cm) | Deep V-neck accent or lariat |
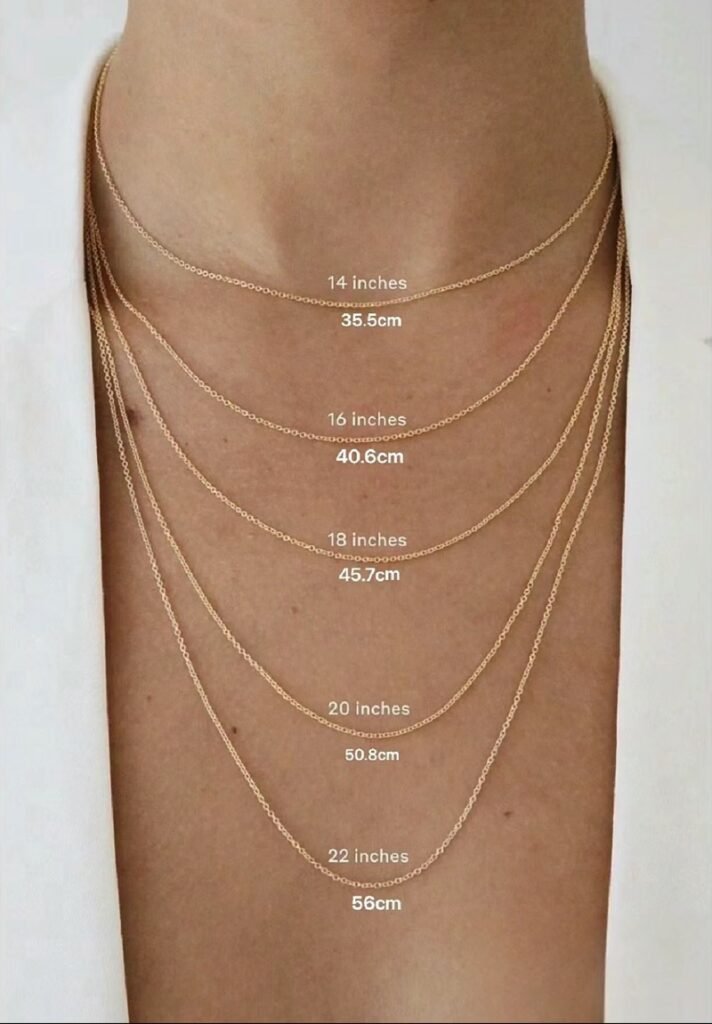
A Simple 3-Step Layering Formula
- 1. Start at the neck (14–16 inches): Choose a plain base, like a fine box chain, serpent chain, or simple choker.
- 2. Add texture (18 inches): Pick a contrasting weave—such as a paperclip, rope, or herringbone chain—to create visual separation.
- 3. Finish with a focal point (20–22 inches): Add a weighted coin, locket, or gemstone pendant that pulls the center of the stack downward.
| Pro Tip to Stop Tangling: Undo the clasps on two different necklaces and attach the clasp of Necklace A to the jump ring of Necklace B, and vice versa. This creates one continuous loop that balances itself out behind your neck and drastically cuts down on twisting. |
How to Build a Balanced Ring Stack
Stacking rings comfortably requires balancing band weights and keeping space between fingers so your hands can move naturally.
- Step 1: Pick an Anchor Ring: Start with one hero piece—like a signet, solitaire stone, or wide textured band—on your index or middle finger.
- Step 2: Layer Slim Accent Bands: Pair your anchor ring with thin 1mm–2mm bands on neighboring fingers, or stack narrow midi bands above the knuckle on the same finger.
- Step 3: Leave Negative Space: Keep at least one finger per hand completely bare (often the thumb or pinky). This prevents neighboring rings from scratching each other when you move your hands.
How to Style a Curated Ear Stack
A well-curated ear works from heaviest to lightest as you move upward along the earlobe:
- First Lobe Piercing: Place your heaviest piece here—such as a bold hoop, drop earring, or large stud.
- Second & Third Piercings: Step down in size with smaller huggie hoops, minimalist posts, or bezel studs.
- Cartilage & Helix: Finish near the top with low-profile studs, cuffs, or flat-back labrets that lie close to the skin.
Mixing Gold and Silver
Mixing metals is fine as long as it looks deliberate rather than accidental. Three quick guidelines keep it cohesive:
- 1. Use a Mixed Piece: Wear at least one item that combines both metals (like a two-tone watch or a twisted silver-and-gold ring) to tie the look together.
- 2. Match the Design Style: Pair modern, clean-lined gold pieces with modern, clean-lined silver pieces. Avoid pairing antique filigree in one metal with sleek geometric shapes in another.
- 3. Spread the Weight: Distribute both metals across your hands or neck rather than grouping all silver on one side and all gold on the other.
Frequently Asked Questions
Q: Why do my layered necklaces keep tangling?
A: Chains tangle when they share the same length, weight, or weave. Combine different textures (like a smooth snake chain with a linked paperclip chain) and keep at least 2 inches between lengths.
Q: How many rings should I wear on one hand?
A: Three to four rings spread across two or three fingers usually hits the right balance between styled and comfortable.
Q: What is the main rule of jewelry stacking?
A: Vary your scale and texture while sticking to one main focal point per area (neck, ears, or hands).